AI Guide – Episode 5 – ADetailer
Hello, Hexxet here,
This episode turned out way longer than I had anticipated, seeing it covering a rather easy-to-use tool like ADetailer :). ADetailer is a tool that automatically inpaints areas in a pic, enabling you to fix details like faces, eyes, hands, and genitals without you having to do several inpainting steps.
You can find ADetailer on the ADetailer GitHub. There is also a Guide there on how to install it and links to the basic detail selection models if you prefer a guide from the source. Otherwise, please read on, I think/hope I do cover most of it at least for Forge users here.
What is ADetailer?
A Detailer is a little tool that automates inpainting without you actually having to specify inpaint areas or even opening the inpaint tab. You can specify “items” like face, pussy, tits, hands and ADetailer will then automatically find those parts in your image and if found, it will automatically inpaint those areas with “only masked”.
Where to get ADetailer, how to install?
In Forge, ADetailer comes with the basic installation, I think, and you should find it out of the box in the txt2img tab under the Seed textbox.

If it is not there, or if you are using something different than Forge, you can most likely install it over the extension tab. Navigate to the Extension tab, go to “Available”, and click “Load from”:

Search for ADetailer in the results either by typing it in the search bar or by browsing the available stuff. Once found, click install. Once installed… I’d probably restart the AI Program :).
ADetailer should then be a part of your txt2img generation form, like shown above.
How to use it?
On the Txt2Img Tab, you will now find the ADetailer Option. Check it and extend it:

Note the subTabs 1st, 2nd, 3rd, 4th here? You can enable or disable each of these tabs by clicking it and then checking/unchecking Enable this tab. Note, even if a tab is enabled, it will only work if the ADetailer detector is set for that tab.
Let’s settle for faces now. Select face_yolov8n.pt from the drop-box:

Your box does not look like mine? If you are lacking the yolo entries (even though I think they come out of the box with Forge), then you can get them here: https://docs.ultralytics.com/models/yolo-world/
If you are missing the sex stuff, just hit up Civtai and type “ADetailer” in the search box there and get any ADetailer that seems useful to you. You probably want something for pussies, maybe cocks. Eyes and breasts seem useful too, but I’m not using those most of the time.
Where to put the downloaded files? Note: If you downloaded the files as zips, you need to unpack them first. Put the “.pt”-Files into the following folder of your installation (At least for forge): > webui > models > adetailer
Alright, so what does this do? The ADetailer detector is an AI model that is used to detect certain parts in the image you create. In our example, any faces. ADetailer will automatically inpaint all occurrences of these parts and then inpaint them according to:
- A, the positive and negative prompts you specify in ADetailer
- B, in case you did leave those boxes empty, it will use your original prompts
Tip: I often leave the ADetailer prompts empty because I’m too lazy to update them and forget them and then I fuck up further generations in succession :). It still works pretty well with just the original prompt most of the time, but depending on Denoising strength, it might happen that instead of a face (or a pussy) you get a mini pic of what you described as a whole in the mid of your image. In that case, either use the ADetailer prompts or scale down Denoising strength (in the ADetailer Inpainting options).
Tip: (I just read up on this :)): You can use [PROMPT] as a variable inside the ADetailer Prompt. It should be replaced by your original prompt for generation. So you can use: e.g., “[PROMPT], red glowing eyes” in a face repaint to make a girl’s eyes glow red while keeping all the other details of your original prompt without retyping them. (Why not simply add “red eyes” to the original prompt from the get-go? Because red or glowing might then dominate over the whole image in some other obscure ways :))
What about Detection?
Detection is the part of the menu dedicated to creating the areas that will be inpainted by ADetailer.

You might want to set the confidence threshold way higher… like 70-80%. During the inpaint Area generation ADetailer will decide on a confidence it has in that area being what you are looking for (i.e a face, pussy, whatever you specified in the ADetasler Detector). It will basically never be 100% certain, but a high enough confidence usually is right. If we set the threshold to low it might identify an armpit as a pussy or something :).
Tip: Most of the time, you will want to leave “Mask only the top k largest” at zero; however, sometimes you might want to set it to 1. (very unlikely to a higher number). What does it do? If set to zero, all detected areas (above the threshold) will be inpainted. This usually sounds reasonable, but sometimes, for example, a lot of faces are found due to a setting being one big shot of a character with an audience in the background. Inpainting all those faces in the background will take up a lot of time and might not be worth the effort in some cases. If you stumble upon such a case –> set it to 1 and only the face with the highest confidence will be inpainted (which will be the face of the character in the foreground. I guess if you are doing a shot of 2 characters in front of an audience you can set it to 2…) 🙂
What about Mask Preprocessing?
I have no clue. Don’t touch that! ^^
What about Inpainting?
This is the area of ADetailer that is dedicated to the actual inpainting. You will know most of the entries from the inpainting tab already, and they do the same they do there.

In general, I do not advise touching any of these stats aside from the following:
- Denoising Strength: Absolute MVP here. 0.4 usually does the trick, but if the CFG strength of your original generation is set lower, you might need to set this stat lower as well. This defines how much the inpaint may change from the original image. (If you are not using an inpaint prompt, you may have to set this lower as well.) In general, if your unpainted areas show images of your original prompt instead, or if the unpainted areas have very discernible glitches to the rest of your image, you want to lower this parameter.
- Inpaint width and height: Usually, don’t touch, but you can increase this to 1024×1024 instead of 512×512 to get even better resolution. This is only relevant, I think, if you are using HighresFix to generate images above 1024 resolution. For lower res, the default setting should be good enough. (Most of the time it is good enough for highres fix as well IMO)
- Inpaint Mask blur and inpaint only masked padding, pixels: Not 100% sure how to describe it, but these parameters have something to do with how the inpaint area is fitted into your image I guess. Usually, I don’t touch this, but if the breaks in an image get to weird (cause that pussy looks out of place), I increase these and sometimes it helps 🙂
Multiple ADetailer inpaints:
If you want to use a Detailer to inpaint different parts of the image (like face and pussy!) you can do so by enabling and configuring up to all four of it’s subtabs. Inpainting will then be automated in order, starting with the first enabled tab to the last enabled one.
Note: In case you are using subareas of areas you already inpaint to inpaint, like inpainting a face and eyes, you want to first inpaint the bigger area (in this case the face), and then the smaller area (i.e. the eyes). Otherwise, there is no real sense in inpainting the smaller area, because the bigger area will paint over it. So, set the bigger area (face) in the first tab and the smaller one (eyes) in the second. 🙂
Results
When ADetailer is set to work as intended, click Generate, and your image generation will start as normal. Once your image is done, ADetailer will spring into action, detect the specified areas, and inpaint them with more detail. After each inpaint, the image displayed will update to what it looks like now (or to a detail view of what was inpainted). Once all inpaints are done, the generation process will stop as usual, and you have your image, hopefully with awesome details now 🙂
Please note that I think that ADetailer works very well with faces, but for other areas like pussy/breasts often the unpainted areas are deceirnable as inpainted and therefore make the resulting image ugly :C. However, sometimes the results for these are good as well. It’s also probably very model-dependent.
Note: You can use ADetailer from the img2Img tab as well. I’m usually not doing that, but I guess it can be handy there as well.
Note/Tip on Highres-Fix: When using Highres-Fix (which I haven’t covered yet in my episodes), ADetailer (at least to my knowledge) is the only way to inpaint details in a high-quality way, because it directly interlocks with the Highres Fix method. (Normal inpainting by hand does not do the trick in this case because it can only be applied once HighRes Fix is done.)
Pro Tips you probably will never need:
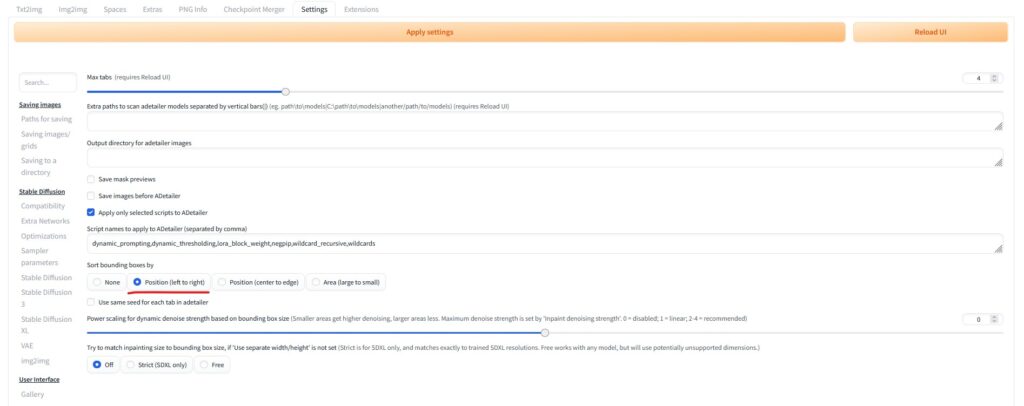
Tip1: If you want to increase the number of tabs to more than 4 (which you will never need!), you can do so in the ADetailer Settings with the Max tabs setting.
Tip2: You can use [SEP] to specify multiple prompts in one prompt. Why? Because you might want to inpaint multiple faces or persons, and one has blue eyes, the other green eyes. In this case, you can just do: [PROMPT], green eyes [SEP] [PROMPT], blue eyes.
Now, the order in which areas are processed is pretty much random IMO out of the box. So, in order to use this in a meaningful way, go to Settings > ADetailer Settings (within your Stable Diffusion UI), and check “Position (left to right)” under “Sort bounding boxes by”. Now, inpaint areas will be processed from left to right,t and therefore you can calculate which girl’s face is inpainted first. (However, you of course need to know the resulting image in the first place. So this works for regenerations from seeds, and in img2img generation, where you already know the original image from the get-go and just want to inpaint stuff :´).